Saturday, December 29, 2012

Activities from our advent calendar - the third week

If you follow me on Facebook , you could see that we were sick a few days before Christmas, so there wasn't a lot of creative work, and unfortunately we have not done all the activities from our advent calendar. We have managed to make only one snowman which will be used as a pencil holder.
We pasted some cotton balls at the glass jar and the added paper eyes, nose and mouth.  Here you can see what kind of snowmen we made during the last week.


We also made a paper garland. Fold the paper into five parts (or more, if you have a larger piece of paper). Draw a figure you like (we drew penguins and gingerbread men). You must ensure that the "hands" are drawn to the edge of the folded paper, because in this way the figures stay connected. The idea originally comes from the book of Christmas things to make and do, which I already mentioned in a post about encouraging children to read and to love books.

The Older proudly decorated it by drawing their eyes, nose, mouth, and buttons:


 I wish you a peaceful, delicious and creative holiday season!

Sunday, December 16, 2012

The activities from our Advent calendar - the second week

We continue to open the pockets in or Advent calendar made out of tea bags .
Here's what we have been doing the last seven days:

The 9th of December - the joys of winter


After cleaning the snow on our patio, a new resident settled in our backyard.  How do you like its styling? Luckily I was taking pics immediately, right after we made this snowman, because it soon melted. 


And we made a bird house as well. We were not very creative, with it, we just used plain old box and hang it on a tree, but somehow I think birds don't mind it since the food quickly disappeared. As soon as we find some time, I intend to provide more comfortable accommodation for birds, such as the one on this picture.


The 10th of December - sewing clothes for Barbie dolls


Not exactly a typical pre-Christmas activity, but the temperature has dropped and even Barbie needs some new, warmer clothing. The photos coming soon. 


The 11th of December - making felt ornaments 


I cut two equal pieces of felt and sew them together by using a thread in contrasting color. When I was on "half way", I've inserted a cotton pad among the two felt pieces and continued sewing (see photos below). In the end, I added additional thread so the ornaments can easily be hung on a Christmas tree.


  The 12th of December - making homemade gifts


Unfortunately I have to disappoint you, since I will not upload photos of the gifts we made, as most of my friends read this blog, so in order not to spoil surprises, the photos will come after the holidays.


The 13th of December - balloons in the snow


This is an example of the fact that not all the Pinterest ideas are doable.

It was originally intended for the balloons to turn into large marbles as on this photo, but something went wrong, since they exploded when I was trying to cut their top. I think the mistake was that I have not poured enough water into them. That night the temperature dropped to a freezing -18 Celsius Degrees, so the balloons truly were frozen, but I believe that the large volume of air (compared to water) caused them to explode.


14th December - recycled materials snowmen


Our real snowman started to melt, but that's why we've created these little creatures. We used plastic bottles, markers and some bows to make them.


The Older also made her own snowman.

15th December - a little break


  We were invited on a birthday party, so we had a little break from creative activities. 


Wishing all of you a lot of free time for all the crafts you plan to do!


P.S. I am sharing the post on the following linky parties: 


Sunday, December 9, 2012

Activities from our advent calendar - the first week

We could hardly wait for the time when we could open our handmade advent calendar. Its pockets contain one or more activities for each day. Here's what we have been doing the last week:


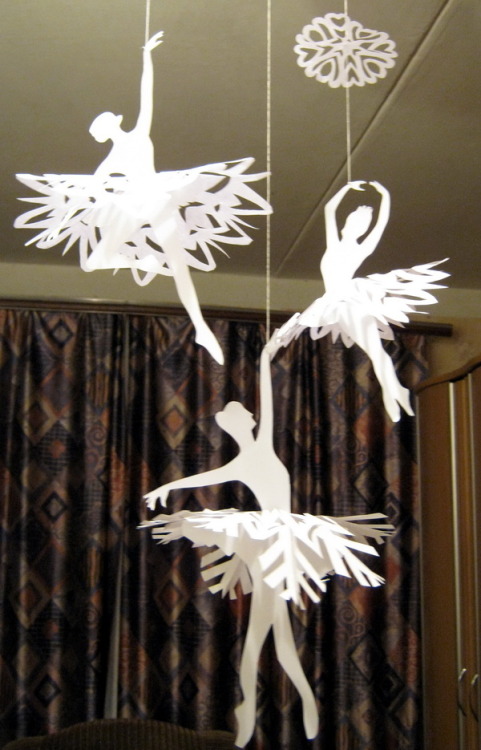
The 3rd of December - paper snowflakes

Except from going to a local Christmas concert for kids, we have made some nice paper snowflakes. When I was a kid, it was one of my favorite winter activities.


Snowflakes can be linked together in a nice garland, like the one on this photo.

 
You can even  make these cute balerina tutus :


Not sure how to cut snowflakes? Look here.

4th of December - making greeting cards


Here is what we created with some cardboard, paper cut from magazines, a glue, cotton pads and pastels:


5th of December - cleaning the boots and doing another season's greetings

Kids in Europe traditionally put their clean boots on the window at the night of 5th December, because they believe St. Nicholas will bring them a gift and leave it in the boots if they have been good all year.


6th of December - visiting local outing site

Lots of Christmas lights, just enough to make a child happy!
Source : gorica.hr

7th of December - 'decorating the tree'


The Older keeps asking when are we going to decorate theChristmas tree. Since we traditionally decorate the tree on Christmas Eve, I gave her to "decorate the tree" in this way:


I found a picture of Christmas trees in the advertising catalogues, which overflooded our mailbox these days more than ever, so I cut them, and let her to make decorations. I think you can guess which cartoon character is this week's favorite.


8th of December making paper chains

50 centimeters of snow fell during the previous night, so we had a lot of winter fun, but we still found time for some crafting.
Paper chains are another nice way to use old catalogues or wrapping paper scraps. I believe that many of you remember this activity from your own childhood.
Cut the paper into strips, then paste it so you get a chain link, and continue to do so on until you have used all the strips. Paper chains can be used as a convenient holiday decoration, especially if you're doing it from wrapping paper scraps.


List of linky parties I participate in:


Keeping It Simple

Friday, November 30, 2012

Advent Calendar made of tea bags

Today, when it's all about copying someone else's ideas, I can proudly say that we did something that was originally my idea. I've thought of it back in September and I could hardly wait time before Christmas so we can start to make it, so I was collecting tea bags the entire fall season.

Tutorial for making the Advent Calendar out of tea bags

You'll need scissors, a cardboard box and some glue (this time I used UHU Glue Pen, by now it's doing well, we'll see when the kids start to open the bags on the calendar).


I cut the box into the desired shape and arranged tea bags , before pasting, just  to see which way would be the best. I've turned the bags inside out, so that they would be white and then wrote the dates on them. My initial plan was to fill the bags wiht mini candy bars, but I think kids today eat too much candy anyway and that finding candies would not be anything special to them, so that's why I've inserted a piece of paper with the activities for each day in each bag. Sometimes it's one, sometimes I plan more activities, depending on whether it's a weekend or a weekday, or whether we have anything else planned for the day, like going to a birthday party, etc. In any case, in the next few weeks I will be writing about these activities.


I know that it is not common to include December 25th in the Advent calendars, but we plan something special for the day as well, therefore, it's in the calendar.

I've used  fancy paper scraps to wrap it in. Besides cardboard boxes, you can use some old registers, or a softer cardboard, but in this case, the calendar can not stand alone as in the picture below.


This is how it looks like after The Big Girl decorated it the way she likes it. The thumbnails are cut from catalogues, and a special pleasure for her were the stickers, used for closing the bags.


 Need more good ideas for making an advent calendar? Look here.

And here's where I am linking this time:


MT Birthday 468


Discount School Supply - Save on Essentials


Wednesday, November 28, 2012

Effective organising - part two

With the upcoming holidays there will definitely be a large amount of chores to do. Of course some of us are not happy with it, but the fact is that some things still need to be done. If you're able to make things easier in some way and not to create additional clutter, that can help a lot. Effective organization of space is one of the ways.

I've already written about more efficient organizing of drawers, whether with clothing, whether with jewelry, and I was also delighted by this great idea of storing balls.


How to avoid rolling lids


This time I want to share with you one, in my opinion brilliant, idea how to effectively store the lids.  

Before I tried this method, my lids were cluttering everywhere. I tried to stack them in pots, but then I could not put pots one in the other (result: lack of space for all the pots). I tried to lean them against the wall, which usually resulted in falling lids, or the fact that it was difficult to reach them. And then I stumbled upon this idea. And just as it is often said in the commercials, my life has changed for the better :) I remembered I have one horizontal CD rack that has never been used for that purpose, so I pulled it from the bottom of a (cluttered) drawer and just in a few minutes, all the lids sat in place. No more falling, hunting for the rolling lid, no more noise which could even wake up a child in a neighboring house, no stunts aimed at retrieving the lid from a remote corner of a cabinets or a shelf.


Depending on what kind of kitchen space you have, the lids can be organized in many different ways:

1) in a basket of old dishwasher (I still use my first dishwasher, so I've never been able to try it)


Source: inthiscrazylife-bethany.blogspot.com.au

2) on the towel bar attached to the inside of the cabinet doors or drawers


3) storing in special shallow drawers


Similar principles can be applied to storing frying pans, muffin tins or casserole dishes


Caught in desire to organize efficiently? Look here for more awesome ideas.


Thursday, November 22, 2012

More homemade toys

Following the post about How to entertain toddlers for a while , here's another nice idea, which I originally found here .

Educational toy for learning colors and developing fine motor skills


This toy can easily be created by making a hole in the lid of a box (we used a shoe box) and the area around the hole gets colored by markers. To me, it was the easiest to pierce a small hole with scissors and then plug a marker cap, to expand a hole in order to match them exactly. The intention is that the child inserts a cap into a hole with a matching color, and in this way the child learns colors as well as develops fine motor skills. The Big Sister wanted to make a toy for The Little one, so I've let her to paint the area around the holes. Here's the result:


It's great to use a box for this game, and not just its lid, because the kids are also amused by putting caps into the box and taking them out. I can confirm that The Little often plays with this and I definitely recommend you to try something like this.


Cardboard garage for toy cars


I also made a toy garage for our cars collection, because The Older's obsession with toy cars continues. 
 A little glue (I used Patafix), cardboard and cardboard roll ...

and here's a roof over their head: 

She especially liked the "corridor" in the middle:

Let the game begin!


P.S. Need more ideas? Check this great linky party - just click on the button bellow!


Monday, November 19, 2012

Entertaining children while cooking


Soon there'll be that famous holiday madness when everyone of us spend a lot of time in the kitchen, because there are always some (un)announced guests.

And how to entertain kids during this time?

 Here are some of my ideas:

Magnets on the refrigerator


As you can see on the photos below, The Cars mania still lasts in our house, but there are other magnets as well. Both of my girls like to have fun in this way. The Older likes to create a story, while The Younger just takes them on and off, but half an hour of peace for me is "guaranteed."


Tunnel with balls

I have seen this idea in several versions on Pinterest . It is super simple, you'll only need a TP tube, little ball or a marble and some glue - I've used Patafix. Unfortunately, this is just not appropriate for younger children as they can swallow a marble and since they had no developed a sense of how hard they can push, they often break this toy. And Patafix attracts them to put it in their mouth. So this is definitely a toy 3 +.


If you have a bigger bouncing ball (like those from vending machines in shopping malls), then it is good to add some additional sticky tape because such balls are heavier, therefore, the rolls need additional security. 


The lower part of my kitchen wall is lined with a cork board, so we made this without any problems, but these can be pasted on a fridge or a window. I don't believe it would be held firmly enough on a plain wall, and there is a danger of damaging wall paint while removing the "installation".


P.S. I know these are lousy photos, but the light in my kitchen is so poor - I think I have a next DIY project for the hubby. :big grin:


A pinwheel in flower pots

A pinwheel must spend winter somewhere - a great place is the kitchen window, there it will always be warm for it. And the girls love to spin it, spin and spin until they are feeling dizzy. Or until a decorative flowerpot is broken. Therefore this activity is also recommended for bigger kids. I allowed the Younger to play with it, but soon the pinwheel itself (thankfully not the flower pots) was damaged before I managed to take some photos. It is this type of pinwheel, click here for a tutorial to make one.


Source: prittworld.com.hr

Involve them in cooking

 
 super tasty chocolate muffins are made in this way ...


This is definitely their favorite. A cute apron with a funny saying and here we go, ready for action. This is appropriate if you are not in a hurry and if you don't mind the mess. It can be a great opportunity to learn something new, and you can even make real scientific experiments.

My girls especially like when we use cookie molds, it reminds them of play dough. 


I've shared this post on the following linky parties:


The Girl Creative#KidsintheKitchen Weekly Linky


Related Posts Plugin for WordPress, Blogger...