Friday, November 30, 2012

Advent Calendar made of tea bags

Today, when it's all about copying someone else's ideas, I can proudly say that we did something that was originally my idea. I've thought of it back in September and I could hardly wait time before Christmas so we can start to make it, so I was collecting tea bags the entire fall season.

Tutorial for making the Advent Calendar out of tea bags

You'll need scissors, a cardboard box and some glue (this time I used UHU Glue Pen, by now it's doing well, we'll see when the kids start to open the bags on the calendar).


I cut the box into the desired shape and arranged tea bags , before pasting, just  to see which way would be the best. I've turned the bags inside out, so that they would be white and then wrote the dates on them. My initial plan was to fill the bags wiht mini candy bars, but I think kids today eat too much candy anyway and that finding candies would not be anything special to them, so that's why I've inserted a piece of paper with the activities for each day in each bag. Sometimes it's one, sometimes I plan more activities, depending on whether it's a weekend or a weekday, or whether we have anything else planned for the day, like going to a birthday party, etc. In any case, in the next few weeks I will be writing about these activities.


I know that it is not common to include December 25th in the Advent calendars, but we plan something special for the day as well, therefore, it's in the calendar.

I've used  fancy paper scraps to wrap it in. Besides cardboard boxes, you can use some old registers, or a softer cardboard, but in this case, the calendar can not stand alone as in the picture below.


This is how it looks like after The Big Girl decorated it the way she likes it. The thumbnails are cut from catalogues, and a special pleasure for her were the stickers, used for closing the bags.


 Need more good ideas for making an advent calendar? Look here.

And here's where I am linking this time:


MT Birthday 468


Discount School Supply - Save on Essentials


Wednesday, November 28, 2012

Effective organising - part two

With the upcoming holidays there will definitely be a large amount of chores to do. Of course some of us are not happy with it, but the fact is that some things still need to be done. If you're able to make things easier in some way and not to create additional clutter, that can help a lot. Effective organization of space is one of the ways.

I've already written about more efficient organizing of drawers, whether with clothing, whether with jewelry, and I was also delighted by this great idea of storing balls.


How to avoid rolling lids


This time I want to share with you one, in my opinion brilliant, idea how to effectively store the lids.  

Before I tried this method, my lids were cluttering everywhere. I tried to stack them in pots, but then I could not put pots one in the other (result: lack of space for all the pots). I tried to lean them against the wall, which usually resulted in falling lids, or the fact that it was difficult to reach them. And then I stumbled upon this idea. And just as it is often said in the commercials, my life has changed for the better :) I remembered I have one horizontal CD rack that has never been used for that purpose, so I pulled it from the bottom of a (cluttered) drawer and just in a few minutes, all the lids sat in place. No more falling, hunting for the rolling lid, no more noise which could even wake up a child in a neighboring house, no stunts aimed at retrieving the lid from a remote corner of a cabinets or a shelf.


Depending on what kind of kitchen space you have, the lids can be organized in many different ways:

1) in a basket of old dishwasher (I still use my first dishwasher, so I've never been able to try it)


Source: inthiscrazylife-bethany.blogspot.com.au

2) on the towel bar attached to the inside of the cabinet doors or drawers


3) storing in special shallow drawers


Similar principles can be applied to storing frying pans, muffin tins or casserole dishes


Caught in desire to organize efficiently? Look here for more awesome ideas.


Thursday, November 22, 2012

More homemade toys

Following the post about How to entertain toddlers for a while , here's another nice idea, which I originally found here .

Educational toy for learning colors and developing fine motor skills


This toy can easily be created by making a hole in the lid of a box (we used a shoe box) and the area around the hole gets colored by markers. To me, it was the easiest to pierce a small hole with scissors and then plug a marker cap, to expand a hole in order to match them exactly. The intention is that the child inserts a cap into a hole with a matching color, and in this way the child learns colors as well as develops fine motor skills. The Big Sister wanted to make a toy for The Little one, so I've let her to paint the area around the holes. Here's the result:


It's great to use a box for this game, and not just its lid, because the kids are also amused by putting caps into the box and taking them out. I can confirm that The Little often plays with this and I definitely recommend you to try something like this.


Cardboard garage for toy cars


I also made a toy garage for our cars collection, because The Older's obsession with toy cars continues. 
 A little glue (I used Patafix), cardboard and cardboard roll ...

and here's a roof over their head: 

She especially liked the "corridor" in the middle:

Let the game begin!


P.S. Need more ideas? Check this great linky party - just click on the button bellow!


Monday, November 19, 2012

Entertaining children while cooking


Soon there'll be that famous holiday madness when everyone of us spend a lot of time in the kitchen, because there are always some (un)announced guests.

And how to entertain kids during this time?

 Here are some of my ideas:

Magnets on the refrigerator


As you can see on the photos below, The Cars mania still lasts in our house, but there are other magnets as well. Both of my girls like to have fun in this way. The Older likes to create a story, while The Younger just takes them on and off, but half an hour of peace for me is "guaranteed."


Tunnel with balls

I have seen this idea in several versions on Pinterest . It is super simple, you'll only need a TP tube, little ball or a marble and some glue - I've used Patafix. Unfortunately, this is just not appropriate for younger children as they can swallow a marble and since they had no developed a sense of how hard they can push, they often break this toy. And Patafix attracts them to put it in their mouth. So this is definitely a toy 3 +.


If you have a bigger bouncing ball (like those from vending machines in shopping malls), then it is good to add some additional sticky tape because such balls are heavier, therefore, the rolls need additional security. 


The lower part of my kitchen wall is lined with a cork board, so we made this without any problems, but these can be pasted on a fridge or a window. I don't believe it would be held firmly enough on a plain wall, and there is a danger of damaging wall paint while removing the "installation".


P.S. I know these are lousy photos, but the light in my kitchen is so poor - I think I have a next DIY project for the hubby. :big grin:


A pinwheel in flower pots

A pinwheel must spend winter somewhere - a great place is the kitchen window, there it will always be warm for it. And the girls love to spin it, spin and spin until they are feeling dizzy. Or until a decorative flowerpot is broken. Therefore this activity is also recommended for bigger kids. I allowed the Younger to play with it, but soon the pinwheel itself (thankfully not the flower pots) was damaged before I managed to take some photos. It is this type of pinwheel, click here for a tutorial to make one.


Source: prittworld.com.hr

Involve them in cooking

 
 super tasty chocolate muffins are made in this way ...


This is definitely their favorite. A cute apron with a funny saying and here we go, ready for action. This is appropriate if you are not in a hurry and if you don't mind the mess. It can be a great opportunity to learn something new, and you can even make real scientific experiments.

My girls especially like when we use cookie molds, it reminds them of play dough. 


I've shared this post on the following linky parties:


The Girl Creative#KidsintheKitchen Weekly Linky


Saturday, November 17, 2012

How to encourage children to read and to love books

Ever since I can remember, I'm crazy about books. Often I hear the story of how, at the age of three, I used to sit, crossed my legs, took a picture book (holding it upside down) and then I would say, "Reading, reading .... and here's where the story ends!"

I seem to have managed to encourage this love with both of my girls. Maybe it's because I read a lot during pregnancy and used to lay the book on the belly :)))))

Here's how their reading corner looks like:


Originally it was a dice table, its top plate can be removed, and below there are two vessels. In the summer, we used it for water games, and over the winter it got completely new purpose.

I think The Little is definitely one of the youngest visitors of our great library, and currently she is most interested in throwing as many books as possible, off the shelves. Luckily she is so cute (objective Mom!) so the librarians still forgive her. Although there is one giving us significant looks.


Where and how to get affordable books


Once a year, at the Spring Fair, our library sells written-off books at a bargain price, which is a great source for supplying the home library, since they sell books in a really good condition. Purchasing second hand books is also possible on ebay and other similar sites. There is also a specialized book fair every year in November at my hometown, so I try not to miss it, since all the relevant publishers offer new books also at bargain prices.

The best picture books we have ever read


Here's a list of picture books that we've read and I recommend them to everyone, since they are educational and we had a lot of fun while reading them.
A few books for parents are also on this list, but since they are offering activities for children, they should definitely be a part of it.


Stan and Jan Berenstain: The Berenstain Bears 

Source: en.wikipedia.org


I know many of you must have heard of them before, or even read them in your childhood, since these books celebrate 50th anniversary, but to me they are something rather new, because they have not been translated into our mother tongue until recently.

Excellent, educational picture books that talk about real situations children cope with, titles say it all: Too much TV, Too much junk food, Messy room, Big Blooper and many more.

Highly, highly recommend!


Scaredy squirell

Excellent, high-quality picture books that talk about how we protect children too much, preventing them in exploring the world. Although published back in 2008, this is also something new for me (think I haven't seen it so far at the local library). My girls love it so much, it's very funny.

Source: kidscanpress.com


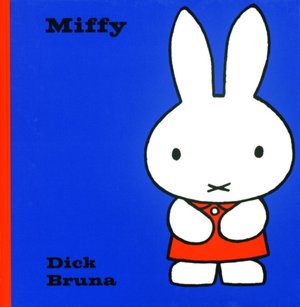
Who hasn't heard of Miffy? Simple shapes, vivid and memorable lyrics are a magnet for children, but also for mums and dads. The books are available in hard and soft covers, so that the smaller and bigger children can have fun with them.
At the age of two and a half years, my older daughter  already knew to recite most of lyrics from "Miffy is crying", which tells you enough about the simplicity of its verses.
I also like "Miffy and the new baby", since it's a great explanation and preparation for the older kids at the arrival of a new baby in the family.
There are many great cartoons with Miffy as well. 

Source:miffy.com


Excellent, educational picture book, aimed at children aged 2-4 describing the topics such as hand washing, potty training and combing, the skills which kids at this age are adopting, and this picture books certainly can help them in doing so, because they are written in a funny way and accompanied by simple illustrations. 


Source: harpercollins.co.uk


Unfortunately not all of the published titles are translated into our mother tongue, so my kids have read only "I want my potty" and  "I don't want to wash my hands". Looking forward in finding new titles in our language.


Christmas things to make and do

Mommy looks forward in reading it, since it has more than 80 (easy!) ideas and activities for the upcoming holidays. I have a feeling that you will be reading about the activities from this book very soon. :)

Source: IglooBooks.com


And finally - Read, read and just read .....!

See what I have pinned about book love .

NOTE: originally I have included more books in my Croatian post, but I couldn't find all of the books translated in English, so I've shortened the list.


P. S. Have you seen this great linky party?

Photobucket

Friday, November 9, 2012

Five ways of using stale bread


I'm the generation who was still raised in a way that nothing should be thrown away, especially bread, since "it would be a sin".

I believe that the recession (and scenes of famine in the world) forced many of us to rethink of how much food we throw away, and is it somehow possible to reuse it?

Here are a few ideas how to use stale bread, which honestly really isn't tasty after few days despite all the additives.


1.    Fried bread
I've heard people call it "bread in the egg" or even a "French toast" (although I am not quite sure whether it actually is a recipe for the French toast). But one thing I'm definitely sure - it's great as breakfast on weekends, when you are not in a hurry.

slices of stale bread
3 eggs
0.02 gallons of milk (it's half a cup)*
salt
sunflower oil for frying - not much, just enough to cover the surface of the pan

*Note: originally I have used milliliters, since we use the metric system in Europe, but I have recalculated it for you. Here is a great calculator for doing so.  

The preparation is very simple - cut the bread into slices and dip it shortly in a mixture of eggs, salt and milk. The bread should be a day or two old, not too dry, because it will break while you cut it and you won't be able to form nice, regular slices. Moreover, you shouldn't cut in too thin slices, because they will fall apart when soaked in the eggs and milk.

Now it is ready for frying in hot oil on both sides. For quicker preparation, bake it "in parallel", meaning in two pans at once, and use a pancake knife for turning it around. It should be served and eaten immediately, it isn't very tasty when cooled. It's great in combination with sour cream or Philadelphia soft cream cheese.


2.     Warm sandwiches
Serve with lettuce and a cup of yogurt and you'll have an easy and tasteful dinner. 

slices of bread
1 sour cream
2 eggs
0.8 oz* of turkey ham 
0.8 oz of a semi-hard cheese
salt
oregano
2 oz mushrooms

*Note: originally I have used grams, since we use the metric system in Europe, but I have recalculated it for you. Here is a great calculator for doing so.  

Buy a ham and cheese cut into slices and cut them yourself into even smaller pieces (because it will be easier to spread the mixture on bread slices evenly). Then mix sour cream, eggs, turkey ham and cheese and mushrooms if you like them, in a separate bowl.

Spread some butter (don't melt it - here's why) over your baking pan and put in the ​​slices of bread and spread the mixture over bread. Bake for about 20 minutes at 350 degrees* (be near the oven, it's over quickly, depending on how thick you spread the mixture). When you see that they are almost done, pour some milk in the pan and leave it for five minutes in the oven. This step is necessary for the sandwiches not to get too dry.

*Again, I've used Celsius degrees - so I've heated my oven at 180 Celsius degrees which is around 350 in Fahrenheit. Here's another great calculator for temperature equivalent.


3. Bread casserole 
I originally found the recipe here , but I've adapted it a little to my own taste. Served with seasonal salad, it becomes another quick, easy, tasty and very cheap dinner.

20 oz stale bread
0.05 gallons sour cream (it's one cup here in Europe) - I am using the one with 20% fat because it has fuller taste
just a bit of sunflower oil, otherwise it's too greasy
4 oz cottage cheese
5 eggs
salt
Parmesan cheese

Spread some butter over a baking pan (again, don't melt it - here's why). Cut old bread into cubes and pour into the baking pan. Stir the eggs, sour cream, oil, salt and cream cheese. Pour mixture over the bread and stir well again. Sprinkle Parmesan and bake it in the preheated oven for about 30 minutes at 400 degrees Fahrenheit. You know it's over when it gets brown stains on the top.


Note: if you're like my hubby and "can't live without meat", put some ham/prosciutto slices over the bread mixture (before adding Parmesan). 

*Again, I've used Celsius degrees - so I've heated my oven at 200 Celsius degrees which is around 400 in Fahrenheit. Here's another great calculator for temperature equivalent.


4.    Bread crumbs

If the bread is already so old that it is cracking and crumbling even when cut by an electric knife, it is not suitable for the recipes above

In this case, I leave it to dry completely, but I cut it into smaller pieces before leaving it to dry (so that later I can easily put it in the grinder hole). You can spread it in a larger bowl near the stove or radiator. Given that I have two curious little girls who would definitely topple it and scatter it on the floor, then I wrap it in paper (plain paper, not plastic bag, otherwise it gets that awful green stains) and leave the bread in the kitchen. After a few days, the bread is ready for grinding into crumbs, I use a grinder for walnuts (again I remind you that it is important to cut it into smaller pieces before it's totally dry).


I store the crumbs in tightly sealed glass or plastic containers. In that way, they can last for several months without any visible changes in the smell or the taste, just store it in a dry and cool place. All kinds of bread are appropriate for this recipe.

Breadcrumbs are usually used for frying meat, or with plums dumplings.


5 ,    As an ingredient of meat loaf

Another use of the stale and very dry bread.

a few slices of stale bread - any type of bread
hot water / milk - enough to cover the bread entirely
1 egg
20 oz minced meat
spices: salt, pepper, red sweet pepper
butter

Parmesan cheese and / or bread crumbs

Soak bread slices in warm water or milk (soak it deeply, it's not enough if it just floats on the surface). Leave it for a while. In the meantime, stir 1 egg, 20 oz minced meat, salt, pepper, and red sweet pepper. Drain the bread and stir it into the mixture. Spread the butter over a baking pan (don't melt it - here's why) and pour the mixture in the pan.

Optionally, you can sprinkle the Parmesan cheese and / or bread crumbs. Bake at 350 degrees* for about half an hour.

Bon apetit!

*Again, I've used Celsius degrees - so I've heated my oven at 180 Celsius degrees which is around 350 in Fahrenheit. Here's another great calculator for temperature equivalent. 


P.S. I've also shared this post at this awesome linky party:

 
The Shabby Nest


Tuesday, November 6, 2012

Geoboard DIY

I've seen this thing called geoboard, all over Pinterest, but of course, it's not available in our local stores. Honestly, it's so easy to make it, that it would be a shame to spend money on it.

Required materials: cork board, little pins, rubber bands.

Put pins randomly on a cork board, and then surround them with the rubber bands to see which shapes you can make. Help your child to name them - rhombus, trapezoid, square, rectangle, circle, triangle. Encourage the child to make some of the shapes - it is great for developing fine motor skills. By using it with older children (primary school age) you can easily explain them the whole concept of perimeter and surface area. Here's how we've done it:


A dear friend of mine suggested we could use it for learning letters as well:


Warning: This really is a 3 + toy , because the pins are very small and extremely dangerous if swallowed, so use extreme caution, especially if you have younger children below this age!


P.S. You know how I love linky parties -


Monday, November 5, 2012

Rapunzel hair made of a potato sack

After Merida, we are delighted by another Disney heroine. This time it is Rapunzel, the main character in the cartoon "Tangled." If you haven't seen it, I really recommend you to do it, because it has a message for adults and parents as well - talking about how it is not possible to keep the kids "under a glass bell", because children eventually find their way out.

And here's how we used the old potato sack to make a Rapunzel inspired craft. Proudly I can say that it is made out of 100% recycled materials. Besides the already mentioned potato sack, we have used thin cardboard packaging as a base, and the dress is made ​​out of old magazines. I have started by drawing a face (I admit, my drawing skills haven't really progressed since the days of primary school ;), then I've cut all the necessary parts, and my "big girl" pasted it on the cardboard. She also tried cutting, but it didn't end well, since she is still learning how to use scissors. Mental note to Mom: you can finally buy children's scissors!


It took us about 15-20 minutes to prepare it - it is all very simple, quick and easy, as usual in our little art workshop!


Saturday, November 3, 2012

Review of a book “A simpler season” by Jessica Fisher


I was honored by the great opportunity to read a new e-book “A simpler season”, by Jessica Fisher, before it was published, and especially that I was invited to make an honest review of it. 


However, I suppose the author won’t be very happy with my review since I ABSOLUTELY LOVE IT, AND AGREE WITH IT IN EVERY SINGLE WORD (you know how the writers are, always over-critical to themselves).

I intend to follow her advices these holidays, since her point of view is so close to mine – I am the one of those weirdoes who tries to put an emphasis on the spiritual and not the material side of Christmas, I always feel left out when I try suggesting people to skip giving gifts this year. If I had been writing a similar-themed book, I would have written many sentences she had used, and I must say I have never met her, since I live in the opposite part of the world.

 I mean, how can I not love it when she quotes Grinch:
“Maybe Christmas does not come from a store
Maybe Christmas perhaps means a little bit more”
Now, for the first time ever, I find that green fellow Grinch to be actually nice.

If you are fond of making plans, you will love the part when she suggests you to have a plan about holidays, and various printables she provided will be of much use to you. On the contrary, if you’re not a planning geek, you may consider it, after reading her pro-planning arguments.

Speaking about printables, it is great that “A simpler season” was released as an e-book, meaning you can print it over and over again and use it for many years, since she offers many planners, board games, gift tags and so on.

She offers practical ideas and solutions to many problems and situations which occur during holidays – for example, dealing with a complicated family situation in a way no one gets hurt or feels left out.
Inside the book you can also find many great holiday recipes, the ones that have been a tradition in her family and may become your own tradition.
 
I would end this post with her own conclusion – “In reality, we can enjoy more with a lot less.” 

P.S. Interested in buying this e-book? You can do it here or on Amazon.


Related Posts Plugin for WordPress, Blogger...